I’ve used Docker multiple times in the past and I wasn’t very clear on how it worked.
The program’s image (drawing) is:
I have macOS and I’m connected to a Linux Ubuntu server via SSH
I wanted to install a video game server on a Linux Ubuntu server
The installation was done directly on the OS
The installation was giving me a long error log
It was due to compatibility issues
Docker allows you to download and run images (an image is the installation) (public and private) of the program, OS (image base) (there are layers) (each layer is a different image). You can get public images in various places, including Docker itself (the repository)
A container isn’t a “combo” of separate pieces that you choose (App + OS + Hardware). It’s more like an onion with layers that are already glued together
Docker does not emulate hardware. Unlike a virtual machine (such as VMware or VirtualBox), the container uses the kernel of your Ubuntu server directly
Container: Uses your CPU and RAM resources natively
a VM (Virtual Machine or Virtual Machine)
A virtual machine (VM) is software that simulates a complete physical computer.
- It has its own kernel
- It has its own complete operating system (guest OS)
- It has its own drivers and fixed-allocation RAM
For Docker to work on Windows, it needs a Linux kernel.
This generates a lot of latency and uses more resources, because you have to load an entire Windows or Ubuntu system every time.
Since Windows doesn’t have that kernel, it uses a very lightweight VM (via WSL2 or Hyper-V)
It doesn’t feel heavy like installing one Windows inside another. It’s just the “translator” needed for containers to understand CPU commands.
I make this analogy with an hourglass for explain docker:
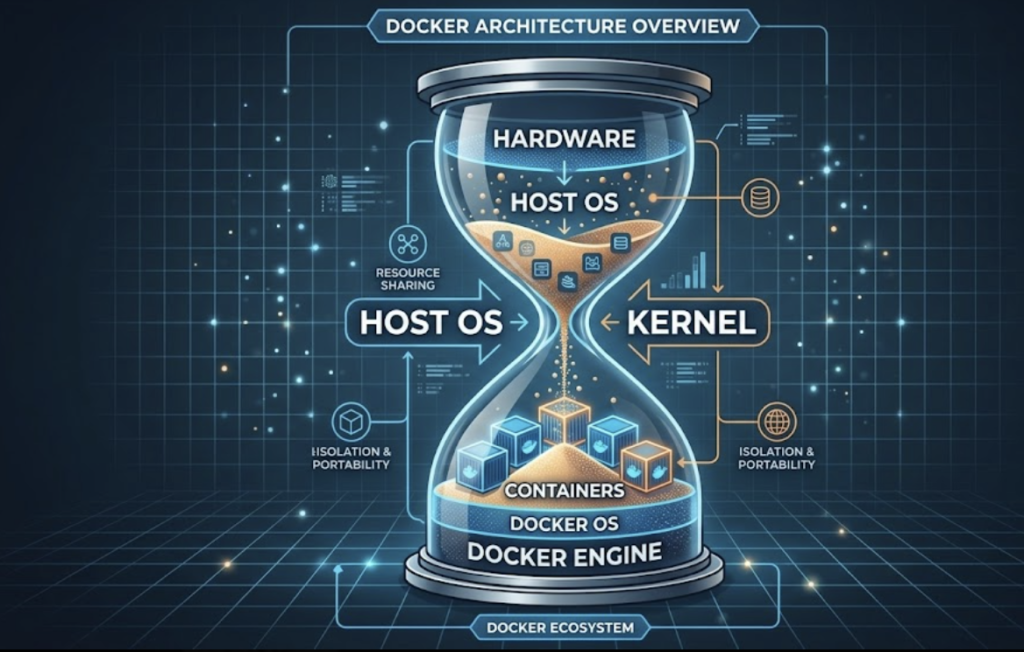
The grains of sand fall from the hardware; right in the middle is the host OS kernel.
The upper part of the sand flows from the most basic (hardware) to the most complex (host OS)
All the sand passes through half of the hourglass, the host’s core (kernel).
Then the sand falls to the bottom; there it would be from bottom to top.
Docker Engine is a program that runs on the host OS and uses the host OS kernel.
- In Linux, the situation is ideal, since Docker uses the host OS kernel and doesn’t create anything new
- macOS, being a Unix-like operating system like Linux, also uses the same kernel for compatibility
- On Windows, unless you’re running Windows containers that use a Windows kernel, there’s no problem. But if the containers run Linux applications, Docker will start a VM with a stripped-down Linux system and kernel
- apps of windows: No problem, it uses the Windows kernel
- linux’s app: Windows boots a VM with a reduced Linux system and kernel
The container does not have a complete operating system. It has no drivers, no graphical environment, and no kernel of its own
It’s an extremely “cut-down” version so that the app can run
You choose a “Base Image” that already includes the minimum “OS” and the libraries you need, and then you paste your code on top
There is no hardware layer: Docker “talks” directly to the hardware of your actual machine
If I use an Ubuntu Server image on my PC, is it the same as installing it on my own PC? Does it use the same hardware?
Exactly, it uses your own hardware, but with a “filter” in between. It’s not a real installation in the traditional sense (where the system takes full control of the disk and boot process), but rather an isolated process that runs on top of what you already have.
Unlike a Virtual Machine (VM) that “pretends” to have its own video card, processor and RAM (emulation), Docker asks your kernel (the core of your system) for permission to use the hardware directly.
- CPU and RAM: If your PC has 16GB of RAM, the Ubuntu container “sees” all 16GB. You don’t have to “reserve” 2GB as you would in VirtualBox
- Speed: The execution is almost as fast as if you installed the program directly on your Windows, Mac, or Linux
The software running inside “thinks” it’s on a real Ubuntu Server. It has its own folders (/etc, /var, /bin) that don’t get mixed up with yours.
There’s no “boot” process. There’s no BIOS, no GRUB, no driver loading. When you run docker run, the container takes advantage of the fact that your PC has already booted and simply launches the process
- The Ubuntu Server container uses the same kernel as your PC. It’s like any other program, but “disguised” as an operating system
- Docker starts a very lightweight Linux mini-virtual machine (invisible to you) and then places the containers on top of that
If you were to install the app directly on your OS (bare metal), you would clutter your system with .NET libraries, SQL databases, and dependencies that are difficult to remove later.
By using the image, you have that “Ubuntu Server” inside a jar:
- You use the full power of your hardware
- If something goes wrong or you want to start from scratch, you delete the container and your PC is left spotless, as if you had never installed anything
It’s like having an instant “spare PC” that uses the same components as yours, but that you can turn on, turn off, or erase in a second
Docker creates an “internal network”
Container-to-Container Communication:
When you have multiple services in the same docker-compose.yml (like nginxy database), Docker creates a private network for them.
You don’t need to use internal IPs (which always change). You can use the name you defined in the file.
For example, the host is simply database (the service name in the YAML), not an IP address.
Container Communication → Operating System (OS):
Sometimes the container needs to hit something that runs outside of Docker (like a monitoring service or a database that you installed directly on the host).
Operating System → Container Communication:
Port Mapping: for example “55901:55901”
- Left: The port on your physical server (the one you open in the firewall).
- Right: The port inside the container where the process listens.
From the OS, you can access the service using localhost:port (provided the port is mapped).
docker0 network interface: The network that Docker uses if you don’t create a custom one.
Docker always needs a Linux kernel to function
- Linux runs Linux (Native)
- The container shares the same kernel
- It’s the ideal scenario
- It’s 100% efficient because there are no intermediaries. A process inside the container is, for the OS, almost the same as a process outside
- macOS runs Linux (Invisible virtualization)
- Docker works perfectly, but macOS doesn’t have a Linux kernel (it has a Unix-like kernel called Darwin)
- When you install Docker Desktop on Mac, what it does behind the scenes is start a tiny Linux virtual machine (VM) (very lightweight, based on Alpine or similar)
- Your containers are actually running inside that mini-VM
- If your Mac is Apple Silicon (M1/M2/M3), the default containers are downloaded for arm64 architecture. If the app only has an image for amd64 (Intel), the Mac emulates it, but it runs a bit slower
- Windows: The most versatile (but confusing)
- Windows is the only operating system that can do “everything” today, but it depends on how you configure it
- That’s what everyone does these days. They use WSL 2 (Windows Subsystem for Linux)
- Just like on Mac, there’s a real Linux kernel running in the shadows inside Windows
- Windows containers in Windows: Older .NET Framework 4.5 applications that cannot run on Linux
- They are heavy containers
A microservice is a specific function of your system
because many people think that using Docker is already “doing microservices”
But you can put a monolith inside a container and it would still be a monolith (only now it’s “packaged”)
The essence of microservices: independence
e.g. If your app crashes, your database or your Nginx (the other microservices) remain active
The Container is that box that includes everything the microservice needs to run (code, libraries, configuration)
The Monolithic Application (The Old): It’s like an old ship where all the cargo is loose in the hold. If a sack of flour breaks, it contaminates the coal and wets the silk. Everything is mixed together and difficult to move
Microservices: These are the logistical decision to separate merchandise (flour on one side, coal on the other)
Containers (Docker): These are steel containers. It doesn’t matter if they contain flour or electronics; the port (your server) has a standard crane to move, stack, and connect them to electricity without knowing what’s inside
Orchestrator (Compose): a docker-compose.yml file that tells each container where to position itself and how to communicate with other
What are Volumes? (Long-Term Memory)
Containers have one key characteristic: they are ephemeral. If you delete a container, everything written inside (a log, a profile picture) disappears forever
Volumes are the mechanism for data to survive the container
The important thing is that if you delete a database container and create a new one, the database records will still be there because the dbdata volume was not deleted
The Volume is the hotel room’s safe. No matter how many guests pass through that room, whatever is in the safe stays there until someone with the key (you) decides to take it out
- You pass your SSL certificates as “Bind Mount” (direct path) because you already have them in /etc/letsencrypt/
- Your database uses a “Named Volume” (dbdata) because it’s critical information that Docker must manage so that you never lose an item or reset your players
Docker on Linux cannot run Windows Server directly. Docker is not a virtual machine; it uses the host kernel. If your host is Linux (Ubuntu), it can only run Linux containers.
Docker with Windows Server: You would have to install Windows on the hardware (the physical PC) and then use Docker Desktop with “Windows Containers”.
For example, if you’re going to use SQL Server: If you’re going to use Windows (either on the hardware or in a VM), you should use Docker Compose to run SQL Server.
For example, I want to install Mu Server (which is a server for a Windows video game): There are no official “Mu Server” images on Docker Hub that work by pressing a button, because Mu is old (Legacy) software that depends on Windows graphical interfaces to be configured. I have to have a image of mu server for linux I havve linux ubuntu server)
Your application sits on top of those layers of files
Installing a program on a specific OS using Docker eliminates compatibility issues, as the entire environment is identical to the one used by the developers and works seamlessly
With Docker you can emulate program + DE it’s all together and called an environment
the environment is isolated
With Docker you can create containers, environments go inside, and you can have several containers with completely different environments
I want to reinstall the video game server on Linux Ubuntu Server, but this time I’ll do it using Docker
In Docker I need to install images: the program (game server), the Linux Ubuntu Server OS version
The program must be compatible with the OS version
Has anyone already tested that the program works with this image
Since someone has already tested it, there won’t be any compatibility issues
So, Docker is for doing 2.0 installations
Once you understand how Docker works, you’ll want to do all your installations with Docker
Docker is very useful in a work team
Let’s assume there are 5 people in a work team
Each of the 5 people has different hardware (PC, notebook, mac)
If out of the 5 people, 2 have the same OS (macOS, Windows, Linux), they have different versions (xp, 7, vista) or distributions (ubuntu, opensuse, debian) (in the case of Linux)


Together they work with Git and upload the source code (not the executable) to a repository like GitHub or GitLab
The code will run on a Linux Ubuntu server, and run on a server
(meaning the executable will not run on any of the 5 computers but on the server)
So each computer has to use the server to run tests? NO
Each computer uses Docker to emulate the server exactly as it is (OS)
Perhaps each computer cannot even run an executable of the source code it is programming
Not directly on your computer, but indirectly and with Docker
Each computer will need images: the application, OS, database image…
You can get the OS image and another knows from the official Docker repository
The application image must be created by each programmer
You need to create a container in Docker and put the images in it
It’s like having a jar (container) and putting ingredients in it (images, app, OS)
This will create the same environment on 5 different computers
The application works the same on all 5 computers and will fail at the same points (you can find the same error in the same way on all 5 computers)
install docker on ubuntu server (or similar)
update the “price list” (so to speak) of what is available in the repositories (It does not install or update any programs)
Synchronize Versions: Your computer now knows that, for example, there is a Docker version 25.0, whereas before it thought the latest was 24.0
New packages: If you’ve just added a new repository (like Docker or Google Chrome), your system won’t know it exists until you perform an update
It’s very common to confuse it with an upgrade (Install those new features that the update gives me on my system, download and install the new packages) (You’ll almost always see people write them together like this: sudo apt-get update && sudo apt-get upgrade)
sudo apt-get updateYou’re telling apt-get to install three essential tools for file security and downloading:
sudo apt-get install ca-certificates curl gnupgca-certificates: Without this, your terminal would give “unsecured connection” errors when trying to download packets from the internet, because it would not recognize the certification authorities, It allows your computer to verify that the websites or servers you connect to (via HTTPS) are who they claim to be.
curl: It is a command-line tool for transferring data. It is used to download files, scripts, or security keys directly from a URL.
gnupg (GNU Privacy Guard): It is a complete implementation of the OpenPGP standard, It handles cryptography. It allows your system to “sign” and “verify” that the programs you are downloading have not been altered by a third party (a hacker, for example), You import a “public key” from the developer, and every time you install something, gnupg checks that the digital signature matches.
When you run that command together, you’re essentially saying, “Prepare my system so I can safely download things (curl), know who to trust (ca-certificates), and verify that files are authentic and virus-free (gnupg).”
It’s like fastening your seatbelt and checking your brakes before heading out onto the internet.
The following command is like creating a safe with specific permissions within your system to store security keys
- -m 0755: Defines folder permissions
- -d: Tells the command: “Create a directory (folder) if it does not already exist”
- /etc/apt/keyrings: This is the path to the folder you are creating
Previously, repository security keys (such as those for Docker or Chrome) were stored in a single file called trusted.gpg
The problem was that if you added a key there, that key was “trusted” by all repositories on the system, which is a security risk
Each repository has its own key in a separate file
It is the current standard to prevent a compromised key from affecting other packages
sudo install -m 0755 -d /etc/apt/keyringsThe following command is a two-part “pipe.” Essentially, it downloads the Docker security key and saves it in a format that Linux understands, preventing anyone from tricking your system with fake programs
- curl: The tool for downloading data.
- -f (fail): If there’s an error on the server, it doesn’t display the HTML error code.
- -s (silent): It doesn’t show the progress bar (keeps the terminal clean).
- -S (show error): If something goes wrong, it tells you why.
- -L (location): If the site has moved, it automatically follows the location.
- https://…/gpg: This is the URL where Docker’s public “digital signature” is located.
- gpg: The program that handles cryptography (security).
- –dearmor: Keys on the internet usually come in plain text (ASCII) format. This command converts them to binary format, which is what the apt system prefers nowadays.
- -o (output): Specifies where to save the output. In this case, in /etc/apt/keyrings/docker.gpg
The “Pipe” |
This symbol takes everything downloaded by the first part and passes it directly to the second part without saving it in an intermediate file. It’s like passing a bucket of water from one hand to the other.
Without this key, when you try to install Docker, your Linux system will warn you: “Danger! I can’t verify who made this program and I won’t let you install it.”
By running this command, you’re telling your computer: “Any program signed with this specific key is an official Docker program and is safe to trust.”
curl -fsSL https://download.docker.com/linux/ubuntu/gpg | sudo gpg --dearmor -o /etc/apt/keyrings/docker.gpgThe following command ensures that any system process can read the key to confirm that the Docker software is genuine, but (thanks to not using +w) no one except the administrator can delete or modify it.
chmod: This is the command to change mode (change the permissions of a file or folder).
- a (all): Refers to everyone (the owner, the group, and all other users)
- +: Adds a permission
- r (read): Read permission
- /etc/apt/keyrings/docker.gpg: The path to the file you are applying the change to
sudo chmod a+r /etc/apt/keyrings/docker.gpgThe following command is not misspelled; it just has a minor formatting “trick.” This command is the final configuration step: it tells your system exactly where to look for Docker files and how to verify their safety.
arch=$(dpkg --print-architecture):This is very clever. Instead of typing “amd64” or “arm64”, the system asks itself, “What architecture am I?”- If you have a regular PC, this automatically becomes
arch=amd64 - If you have a Raspberry Pi or a Mac with an M1/M2 chip, it becomes
arch=arm64 - signed-by=/etc/apt/keyrings/docker.gpg: This is where everything connects. You’re telling Ubuntu: “When you download things from Docker, use the security key we saved in the previous step to verify that everything is okay
- Create a new file in /etc/apt/sources.list.d/docker.list
- From now on, when you run
sudo apt-get update, your computer will no longer only search for programs on the Ubuntu servers, but will also check the Docker servers to download the latest official version
echo "deb [arch=$(dpkg --print-architecture) signed-by=/etc/apt/keyrings/docker.gpg] https://download.docker.com/linux/ubuntu \ $(. /etc/os-release && echo "$VERSION_CODENAME") stable" | sudo tee /etc/apt/sources.list.d/docker.list > /dev/nullThe next step isn’t necessary and you’ve already done it; I do it out of habit
sudo apt-get updateAfter all the previous steps (preparing the keys, creating the repositories and updating the lists), this command is the one that installs the Docker engine on your machine (It’s not a single program, but a “team” of tools that work together):
sudo apt-get install docker-ce docker-ce-cli containerd.io docker-buildx-plugin docker-compose-pluginThe following command is the “VIP pass” for your user. It allows you to use Docker without having to type sudo before each command, This change is not instantaneous. Linux only reads a user’s groups when the user logs in, If you don’t run this, every time you want to do a docker run, the system will tell you “Permission Denied” unless you are the administrator (root) (usermod: It is the tool for modifying users. and $USER: This is an environment variable that is automatically translated to your username and docker: This is the name of the group you are joining. The Docker engine allows any member of this group to give it commands and aG are parameters of the command):
sudo usermod -aG docker $USERThe following command is to check if the Docker Compose plugin was installed correctly and is ready for action:
docker compose versionThe following command is the official “Hello World” of modern infrastructure. It’s the fastest way to verify that everything we installed earlier (the daemon, groups, keys, and engine) is working perfectly:
- The Docker client asks the engine: “Do you have the image named hello-world on the hard drive?”
- Download (Pull): Since it’s the first time, it won’t find it. So it connects to the Docker Hub (the public cloud registry) and downloads that small image
- If everything went well, you will see a text that begins with:
- Hello from Docker! This message shows that your installation appears to be working correctly.
docker run hello-worldnewgrp dockerThe command above is a temporary “patch” to apply group permissions in the current session without logging out. It’s fine to use it for a quick “hello-world” test, but for the change to take effect across all your processes and the server, you’ll need to log out and log back in (exit and log back in)
docker run hello-worldstart/enable: Generally, when you install Docker CE on Ubuntu, the service is already enabled and set to automatic startup. It’s still a good idea to run it, but it will likely tell you that it’s already active.
sudo systemctl start dockersudo systemctl enable dockersudo systemctl status dockerTechnically, nothing is superfluous, but if you want to do it shorter (pro style), you could use the official convenience script that does all that in a single line:
curl -fsSL https://get.docker.com -o get-docker.sh && sudo sh get-docker.sh