Imagine that Nexus Repository is your own private “Google Drive”, but designed specifically for programmers
Nexus organizes project files in a way that Gradle or Maven can automatically understand them.
Nexus Repository uses port 8081 by default upon installation. This is the standard port that Sonatype assigned for its web interface and for communication with build tools such as Gradle or Maven.
If you already have another application using port 8081 on your VPS, you can change it by editing a configuration file.
The file is usually located at: …/nexus-3.x.x/etc/nexus-default.properties
Inside you’ll see a line that says: application-port=8081. Just change that number and restart Nexus.
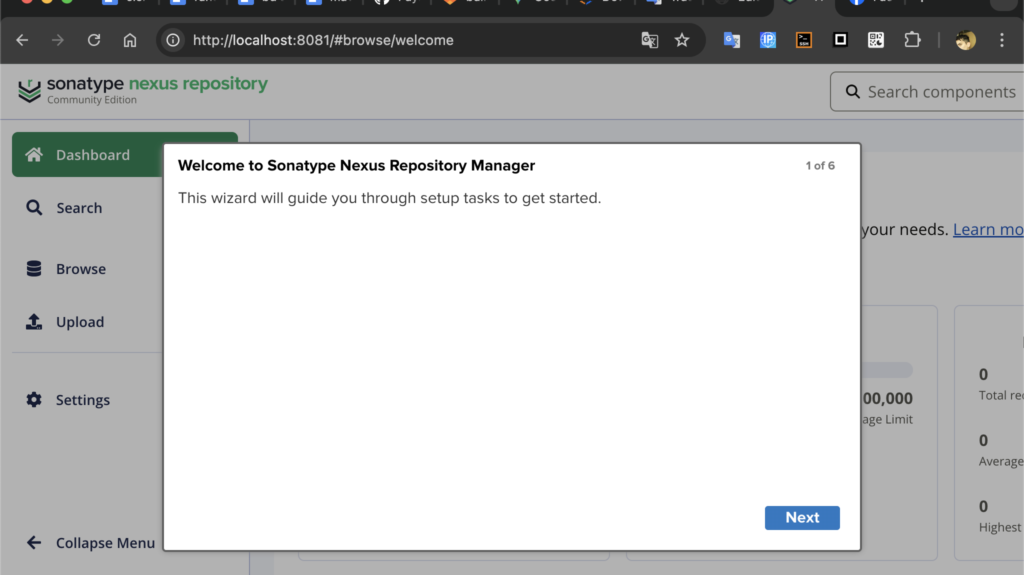
You access through http://localhost:8081
It’s a convention. Just as port 80 is for HTTP and 443 for HTTPS, 8081 has become the standard for Nexus to avoid conflicts with port 8080, which is used by Tomcat or your own Spring Boot applications by default
Upload: From your library project, run ./gradlew publish. Gradle takes the JAR file and sends it over the network to http://localhost:8081
In your REST API project, instead of searching your hard drive for the library, you tell Gradle: “Look at http://localhost:8081”. Gradle downloads it and uses it as if it were an official Spring or Google library.
/usr/local/: This is the traditional path for manual software on Mac
or
Your User Folder (~/): For personal use, you can simply create a folder called ~/maven-server/ and run Nexus from there. You don’t need sudo privileges, and it’s easier to back up
command:
cd /path/to/nexus-3.x.x/bin
./nexus run| Linux (VPS) | /opt/ | Professional standard for services |
| macOS (Intel) | /usr/local/ | Classic Unix path on Mac |
| macOS (Silicon) | /opt/homebrew/ or ~/ | Avoid touching protected system folders |
Nexus is a program written in Java, It will not work unless the server has Java installed first.
Download and “Install” Nexus
in linux:
sudo wget https://download.sonatype.com/nexus/3/latest-unix.tar.gzin macos:
curl -L https://download.sonatype.com/nexus/3/latest-unix.tar.gz -o nexus.tar.gzPay attention to the speed and size: You should see that it takes a few seconds or minutes and that the “Total” column shows something close to 200M. If it ends instantly, something went wrong.
If you download “garbage” (287 bytes), it’s because the Sonatype server is either rejecting the connection or redirecting you to an error page that curl saves as if it were the program.
this is the official link in browser:
https://help.sonatype.com/en/download.html
delete file: (if is neccessary)
sudo rm -f /usr/local/nexus/nexus.tar.gzUnzip the file (This is the “installation”):
sudo tar -xvf latest-unix.tar.gzYou’ll now see a folder named something like nexus-3.70.x. That’s the program!
Start Nexus in the background:
sudo ./nexus startOpen your browser on your Mac and type: http://YOUR_VPS_IP_IP:8081
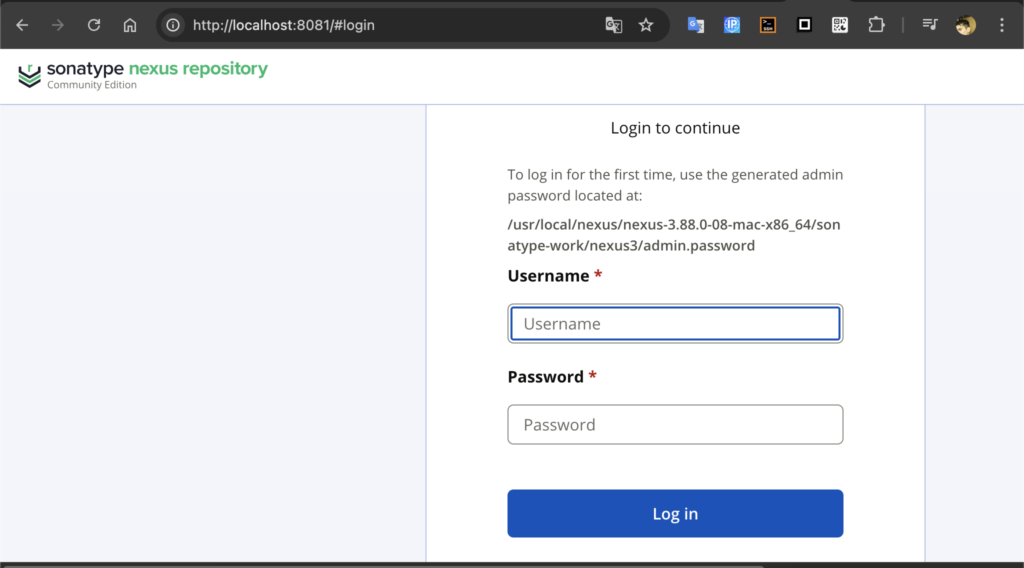
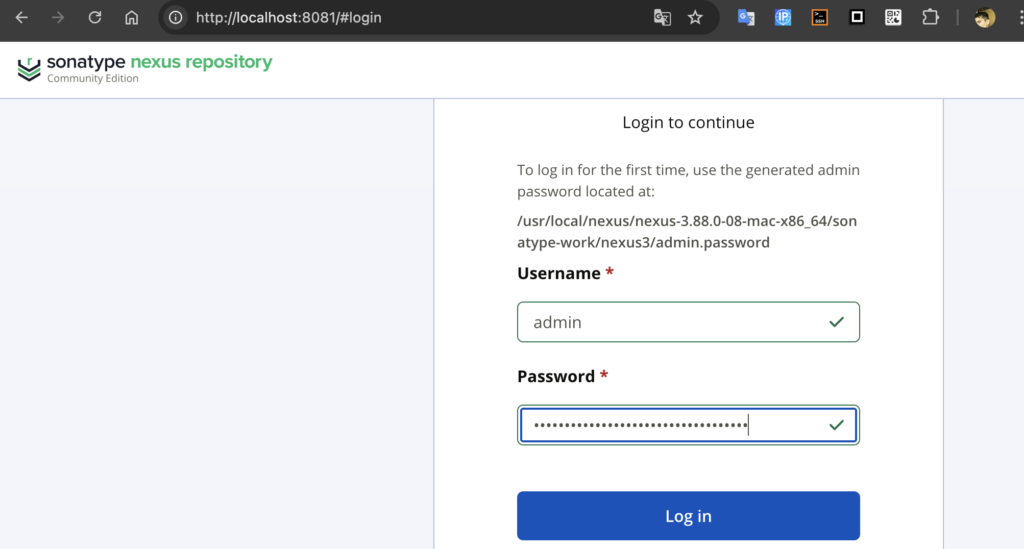
Username: admin
Password: The program creates a text file with a unique password. To view it, run the following command on your VPS: cat /opt/sonatype-work/nexus3/admin.password
On macOS, the /opt/ folder is usually protected or doesn’t exist if you don’t use Homebrew.
The “Permission denied” error occurred because you attempted to write to /usr/local/nexus without administrator privileges. On macOS (and Linux), folders within /usr/local/ are protected.
sudo curl -L https://download.sonatype.com/nexus/3/latest-unix.tar.gz -o nexus.tar.gzor
Make your user the “owner” of that Nexus folder so you don’t have to use sudo every time you want to move a file or start the program:
sudo chown -R $(whoami) /usr/local/nexusTry the original command again
enter in http://localhost:8081/#login
view logs in terminal (if nexus is started) (wait a couple of minutes)
ps aux | grep nexus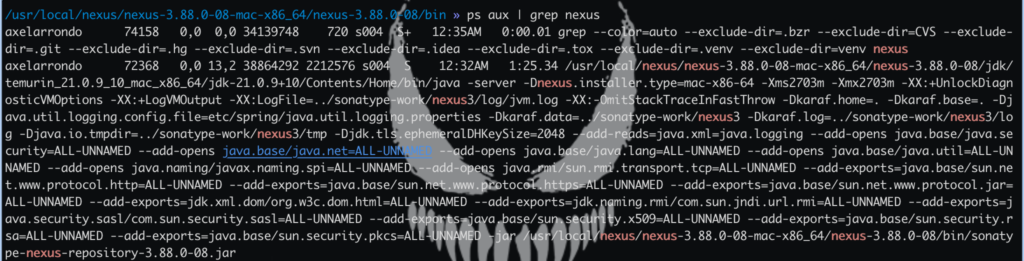
The username is ‘admin’ and you need to find the password
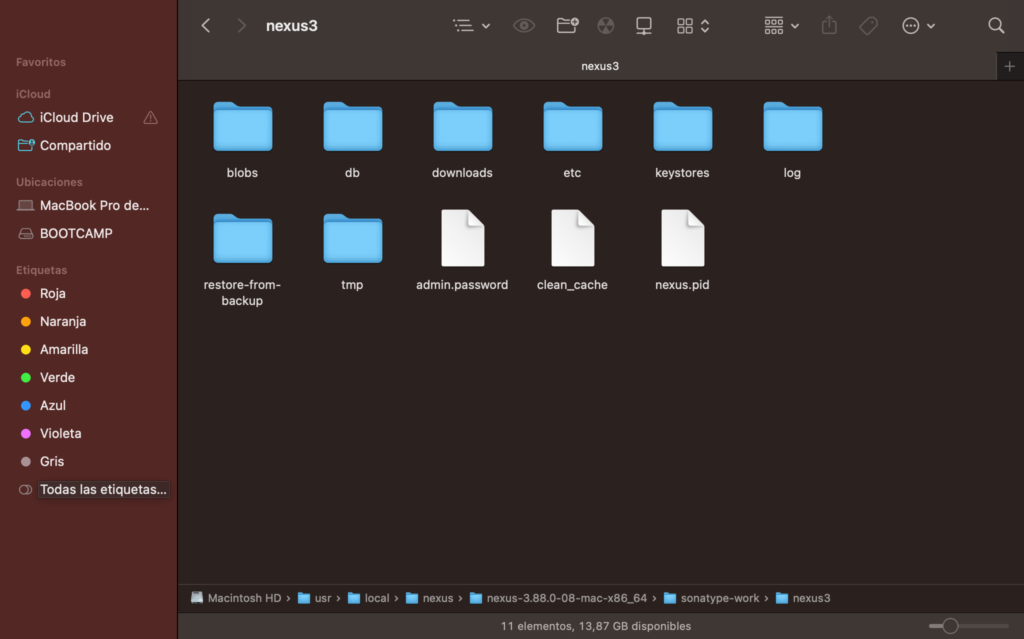
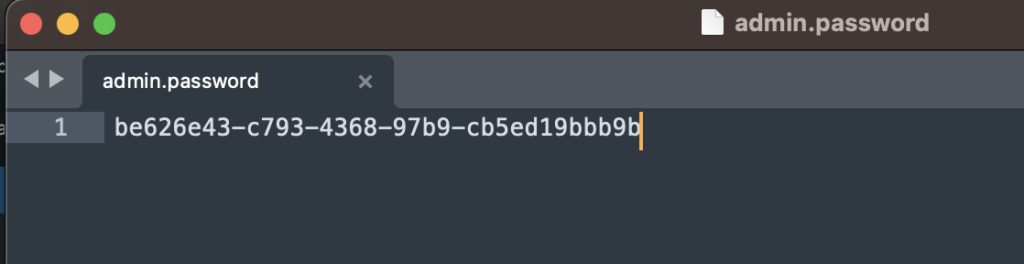
the file is admin.password
admin.password: This is the master key. Nexus creates it for security so that no one but you can log in the first time
The new password you just set isn’t saved in a plain text file like the old one. For security, Nexus stores it in encrypted form within its internal database
cat /usr/local/nexus/nexus-3.88.0-08-mac-x86_64/sonatype-work/nexus3/admin.password
That strange code is the password
Once you’ve mastered uploading files to your Nexus on localhost, all you’ll need to do to get online is change a single word in your code:
Change url = "http://localhost:8081/..." to url = "http://YOUR_VPS_IP:8081/..."
in java springboot gradle:
nexusUser=admin
nexusPass=YOUR_NEW_PASSWORD
build.gradle:
credentials {
    username = project.findProperty('nexusUser') ?: "admin"
    password = project.findProperty('nexusPass')
}
plugins {
id 'java-library'
id 'maven-publish' // Plugin esencial para publicar
}
group = 'com.leibnix'
version = '0.0.1'
java {
toolchain { languageVersion = JavaLanguageVersion.of(21) }
withSourcesJar() // Opcional: sube el código fuente para poder leerlo desde la API
}
publishing {
publications {
mavenJava(MavenPublication) {
artifactId = 'championshipfunctions'
from components.java
}
}
repositories {
maven {
name = "NexusLocal"
// URL de tu repositorio de lanzamientos (Releases)
url = "http://localhost:8081/repository/maven-releases/"
allowInsecureProtocol = true // Necesario para http sin SSL
credentials {
username = "admin"
password = "TU_NUEVA_CONTRASEÑA" // La que pusiste en la web
}
}
}
}
// Esto evita que Spring Boot intente crear un ejecutable (no es una API, es una librería)
tasks.named('jar') {
archiveClassifier = ''
}the command is:
./gradlew publishWhat does this command do?
- It compiles your Java code.
- It generates the .jar file.
- It creates a .pom file (which tells Gradle what dependencies your library has).
- It uploads everything to your local Nexus server through port 8081.
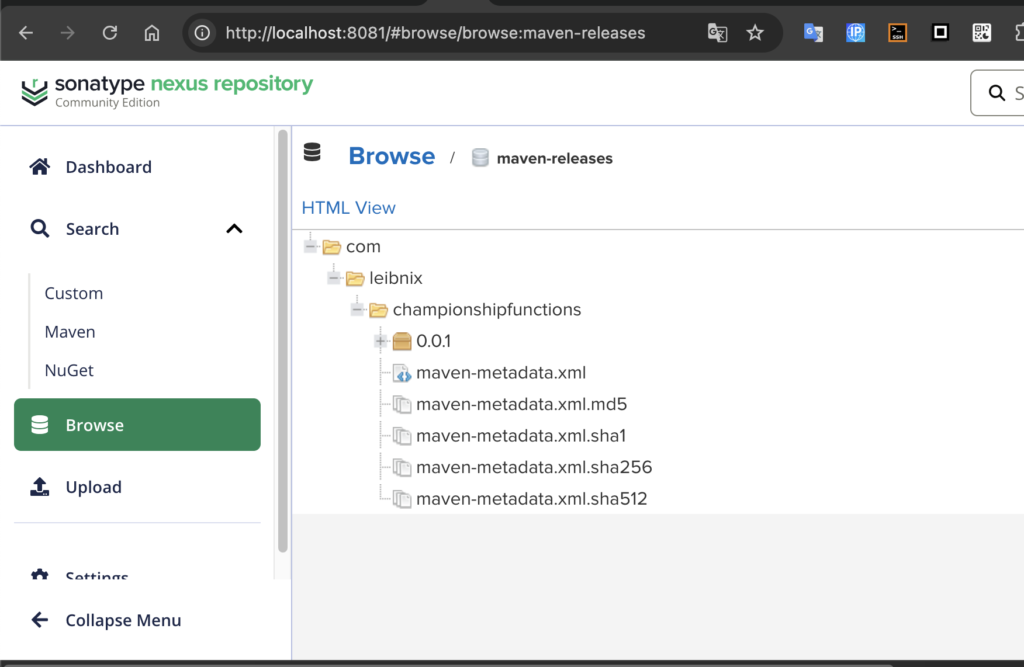
You should see a folder structure: com > leibnix > championshipfunctions > 0.0.1
to use:
repositories {
    mavenCentral()
    maven {
        url = "http://localhost:8081/repository/maven-releases/"
        allowInsecureProtocol = true
    }
}

dependencies {
    implementation 'com.leibnix:championshipfunctions:0.0.1'
}
By default, Sonatype Nexus is not automatically configured as a system service upon installation. You have to manually start it each time or configure automatic startup.
You must create a symbolic link in init.d or a service file in systemd
Create the file: sudo nano /etc/systemd/system/nexus.service
Paste the service configuration (pointing to your Nexus folder).
Run: sudo systemctl enable nexus
with docker:
docker run -d -p 8081:8081 --name nexus --restart always sonatype/nexus3If you publish to Nexus (localhost:8081), the artifacts are saved in the sonatype-work/nexus3/blobs folder. If you ever need to format your PC or move Nexus, this is the folder you should back up to avoid losing your published libraries
publishing {
publications {
mavenJava(MavenPublication) {
// ... (your configuración of artifactId and pom that got)
}
}
repositories {
maven {
name = 'LocalServer'
url = "http://localhost:8081/repository/maven-releases/"
allowInsecureProtocol = true // Necesario para http:// (sin S)
credentials {
username = "admin"
password = "your_password"
}
}
}
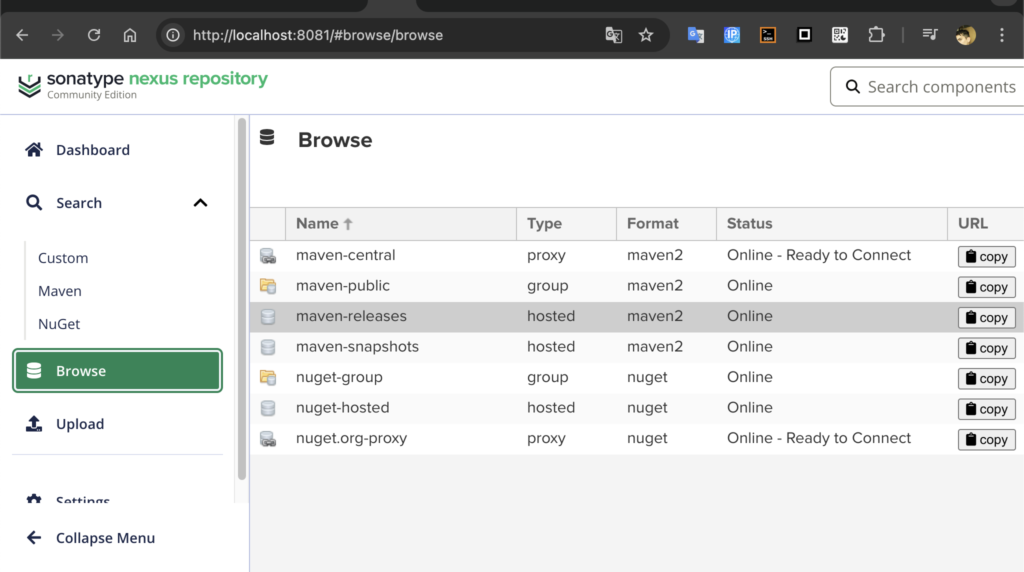
}If you have a repository manager like Sonatype Nexus installed and running on port 8081:
They are stored within the volume or folder where you installed Nexus (usually in a folder called sonatype-work/nexus3/blobs)
Virtually: You will see them by entering http://localhost:8081 in your browser, in the “Browse” section
Before being published anywhere, Gradle always generates them first in your local project folder:
In your-project/build/libs/ you will see the library’s .jar file, the -sources.jar (source code) and the -javadoc.jar file
Generate the unpublished files:
./gradlew assemblePublish to your local .m2 folder:
./gradlew publishToMavenLocalPublish to the server on port 8081:
./gradlew publishMavenJavaPublicationToLocalServerRepositoryreal example:
package com.leibnix.championshipfunctions.configurations;
import org.springframework.context.annotation.Configuration;
@Configuration
public class DatabaseConfig {
// clean file
}
build.gradle:
plugins {
    id 'java-library'
    id 'maven-publish'
    id 'io.spring.dependency-management' version '1.1.7'
}

group = 'com.xxxx'
version = '0.0.1'

repositories {
    mavenCentral()
}

java {
    toolchain { languageVersion = JavaLanguageVersion.of(21) }
    withSourcesJar()
}

dependencyManagement {
    imports {
        mavenBom "org.springframework.boot:spring-boot-dependencies:3.4.1"
    }
}

dependencies {
    api 'org.dizitart:nitrite:3.4.4'
    implementation 'org.springframework.boot:spring-boot-starter'
}

tasks.named('jar') {
    archiveClassifier = ''
}

publishing {
    publications {
        mavenJava(MavenPublication) {
            artifactId = 'xxxxx'
            from components.java
        }
    }
    repositories {
        maven {
            name = "NexusLocal"
            url = "http://localhost:8081/repository/maven-releases/"
            allowInsecureProtocol = true
            credentials {
                username = "axeldamian"
                password = "xxxx" // your Nexus password
            }
        }
    }
}
the .yaml:
spring:
  application:
    name: xxxxx
  data:
    mongodb:
      host: localhost
      port: 27017
      database: xxxxx
gradle:
  org:
    gradle:
      java:
        home: "/opt/homebrew/opt/openjdk@21"
server:
  port: 8081
command:
./gradlew publishMavenJavaPublicationToNexusLocalRepository
to view .jar and files in web: in “maven-releases”